List view
Quick Start
Quick Start
User Guide
User Guide
Policies & GuardRails
Policies & GuardRails
Witness Anywhere: Remote Device Security
Witness Anywhere: Remote Device Security
Witness Attack
Witness Attack
Administrator Guide
Administrator Guide
Palo Alto Networks NGFW Configuration
Network device integrations have been updated in WitnessAI v2.0. Devices configured for WitnessAI v1.5 will need a minor update to support v2.0. Some new features will not activate until your devices are updated.
Existing v1.5 network devices will continue to work without interruption in v2.0.
See the network integration guides in the Integrations menu for details.
Have questions? Our support team will be happy to assist.
Prerequisites
Backup Your Configuration
Always create a backup of the firewall configurations before implementing new changes. For instructions on how to backup the configs, please refer to:
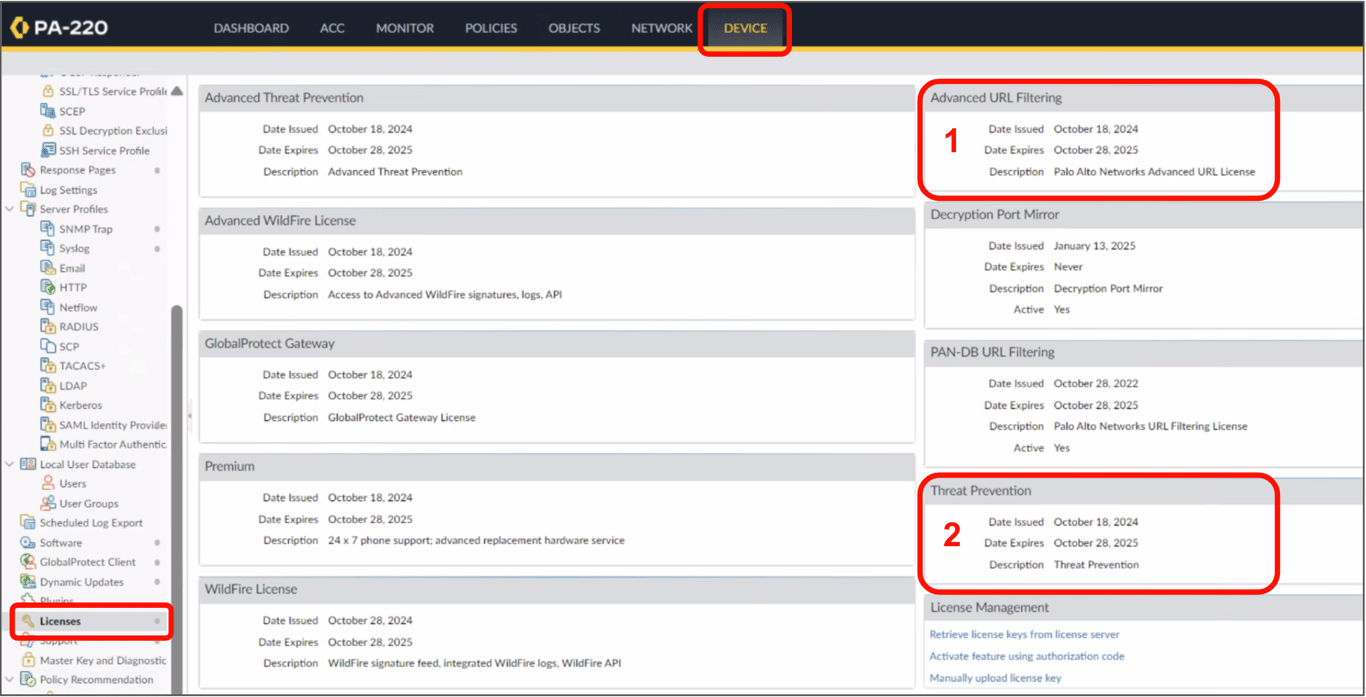
Verify licenses
WitnessAI requires Palo Alto NGFW have licenses for Advanced URL Filtering (1), and Threat Prevention (2).
Verify licenses and check expiration dates in the configuration console.
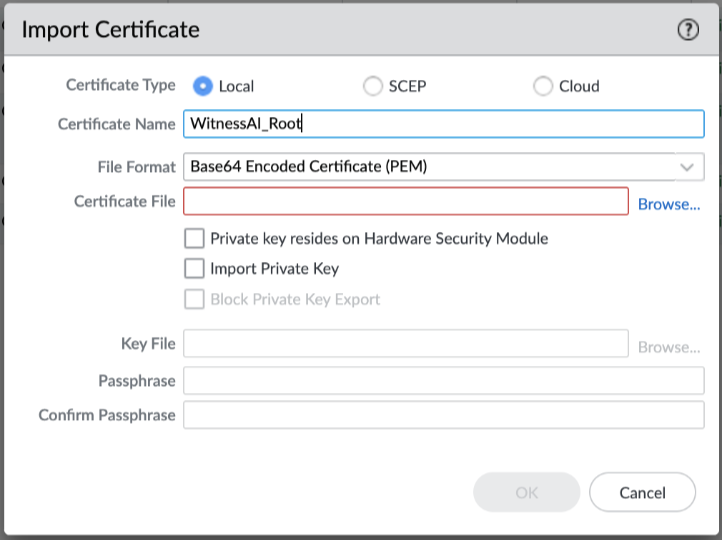
Install WitnessAI Root Certificate
- Go to Device → Certificate Management → Certificates
- Click Import → Import cert provided by Account Team

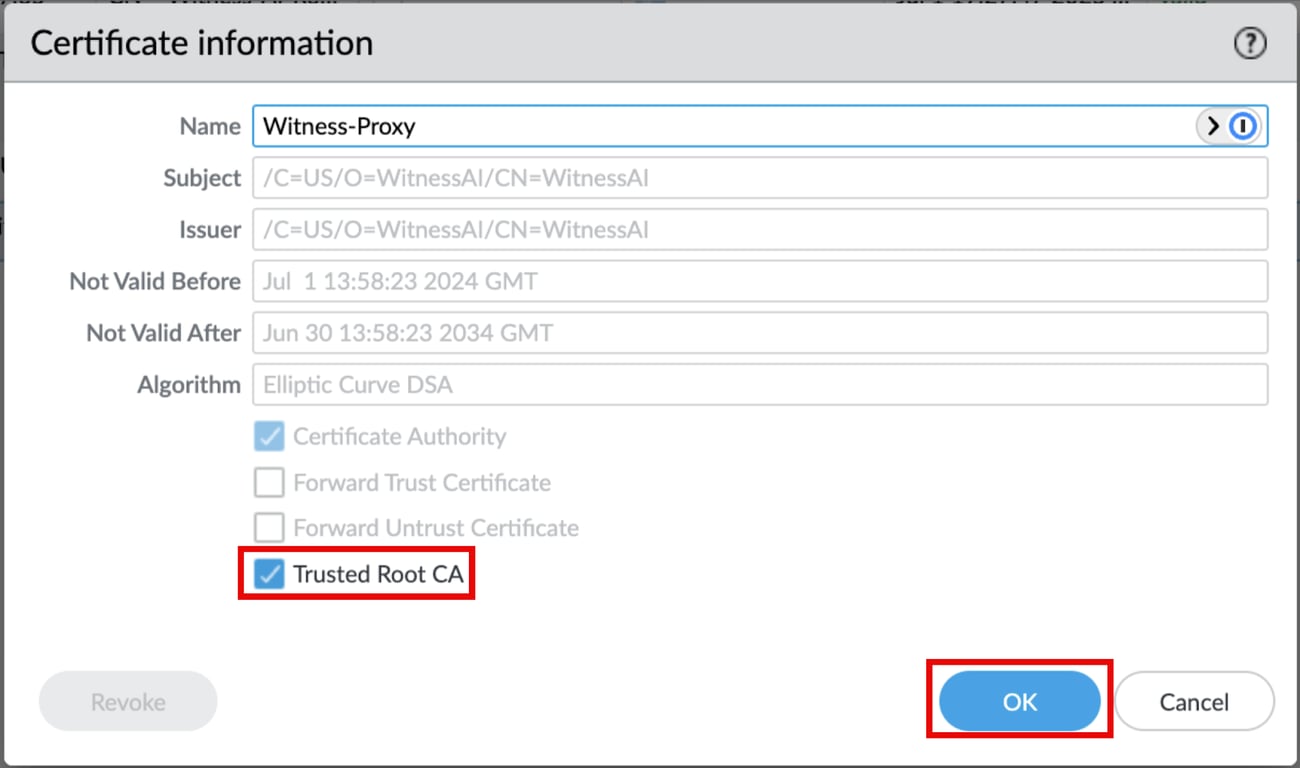
3. Once the cert is imported, Click on it and Select Trusted Root CA and click OK
Setup EDL Certificate Profile
- Certificate will be provided by support.
- Go to Device → Certificates and click on Import
- Give the certificate name as Witness-AI-CA and upload the CA certificate by clicking on Browse
- Go to Device → Certificate Profile and click on Add
- Give the name as Witness-AI-CP and click on the Add button under CA Certificates
- Select the Witness-AI-CA certificate and click OK
- Use this certificate Profile for the EDL Configuration.
Create External Dynamic List
This section will focus on creating the WitnessForwardDomainList, which are LLM projects that traffic will be forwarded to WitnessAI.
1. Go to Objects → External Dynamic Lists → Add
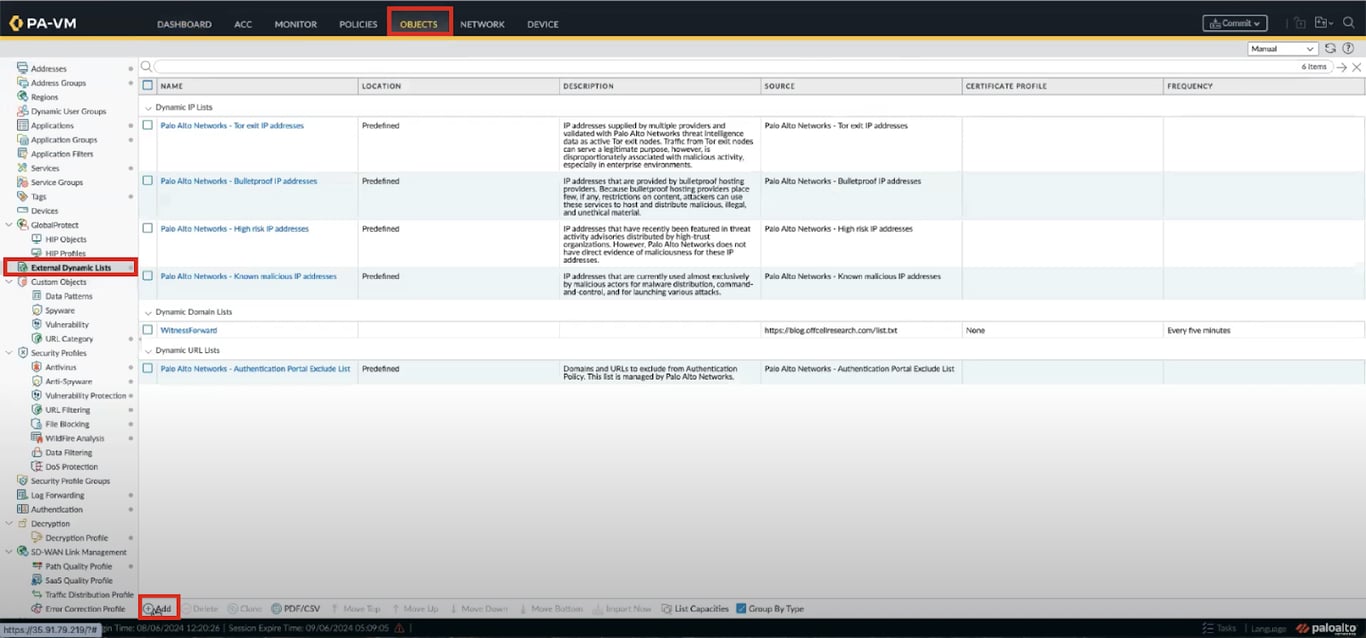
2. Click Add and enter the following configurations:
Name → WitnessForwardDomainList
Type → Domain List
Source → https://api.[tenantID].[region].witness.ai/v1/edls/forwardlist.txt
Check for Updates → Every five minutes
Click OK
Create Custom Application for Office
Create a Custom Application for traffic towards augloop.office.com as Palo Alto Firewall identifies this as a WebSocket connection and fails to insert HTTP headers.
- Go to Objects → Applications
- Click Add and name the application augloop
- Select the basic properties as per the below values:
a. Category → general-internet
b. Subcategory → internet-utility
c. Technology → browser-based
d. Parent App → ms-office365-copilot
e. Risk → 1
- Go to the Advanced tab and select Port
- Add the port information as below:
a. tcp/443
b. tcp/80
- Go to the Signatures tab and click Add
- Configure the following settings:
a. Name → AugloopSig
b. Scope → Session
c. Select Add Or Condition
d. Operator → Pattern Match
e. Context → http-req-headers
f. Pattern → (augloop.office.com)
g. Click OK and Click OK again
Redirect AI Traffic to WitnessAI
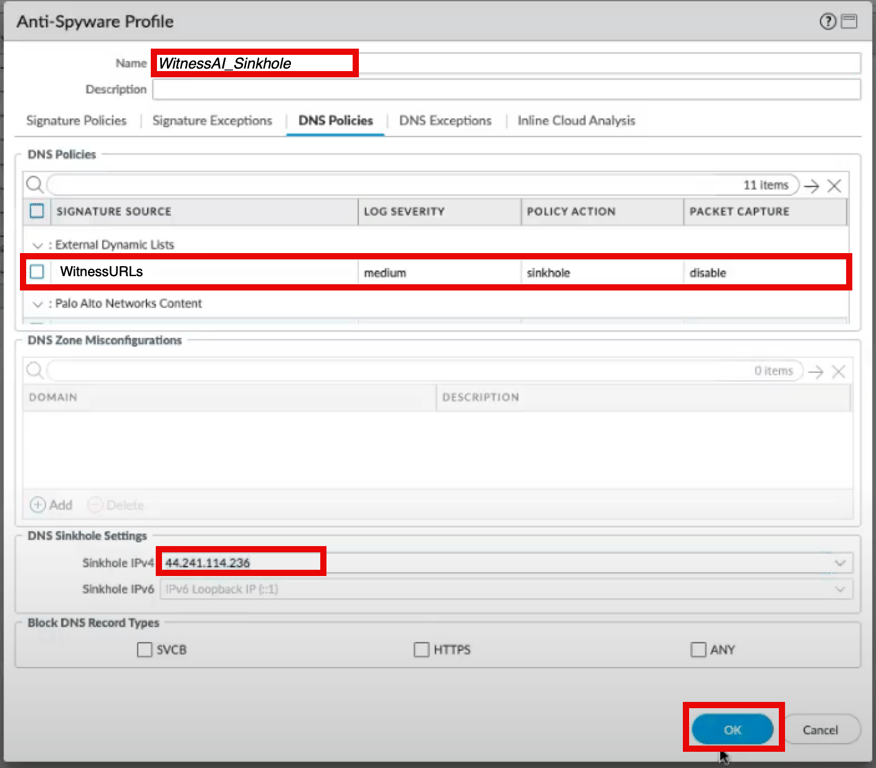
Create an Anti-Spyware Profile to redirect any DNS request from the WitnessForwardDomainList to WitnessAI.
- Go to Objects → Security Profiles → Anti-Spyware → Click Add
- Set the following settings:
Name → WitnessAI_Sinkhole
DNS Policies → Set the Policy Action as sinkhole for WitnessForwardDomains EDL.
Sinkhole IPv4 → See instructions below:
Note: To obtain the sinkhole IPv4 address, ping the following:
connect.[tenantID].[region].witness.ai
connect.[tenantID].[region].witness.ai
Click OK
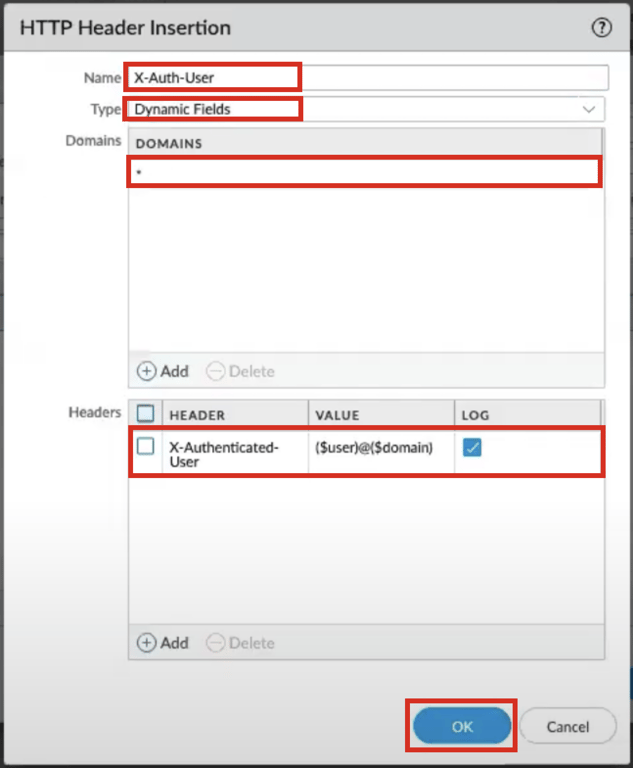
URL Filtering Profile to add User Info
Create a URL Filtering Profile and configure HTTP Header Insertion to add the user email address in the X- Authenticated-User Header field.
- Go to Objects → Security Profiles → URL Filtering → Add
- Configure the following settings:
- Name → WitnessAI_URL-Filtering
- Under External Dynamic URL Lists, select WitnessURLs and change Site Access to alert.
- Note: This will ensure that URL filtering logs are created for any traffic matching these URLs.
- Click on the HTTP Header Insertion tab and click Add
- Configure the following settings:
- Name → X-Auth-User
- Type → Dynamic Fields
- Domain →
- Header → X-Authenticated-User
- Value → ($user)@($domain)
- Check the Log box
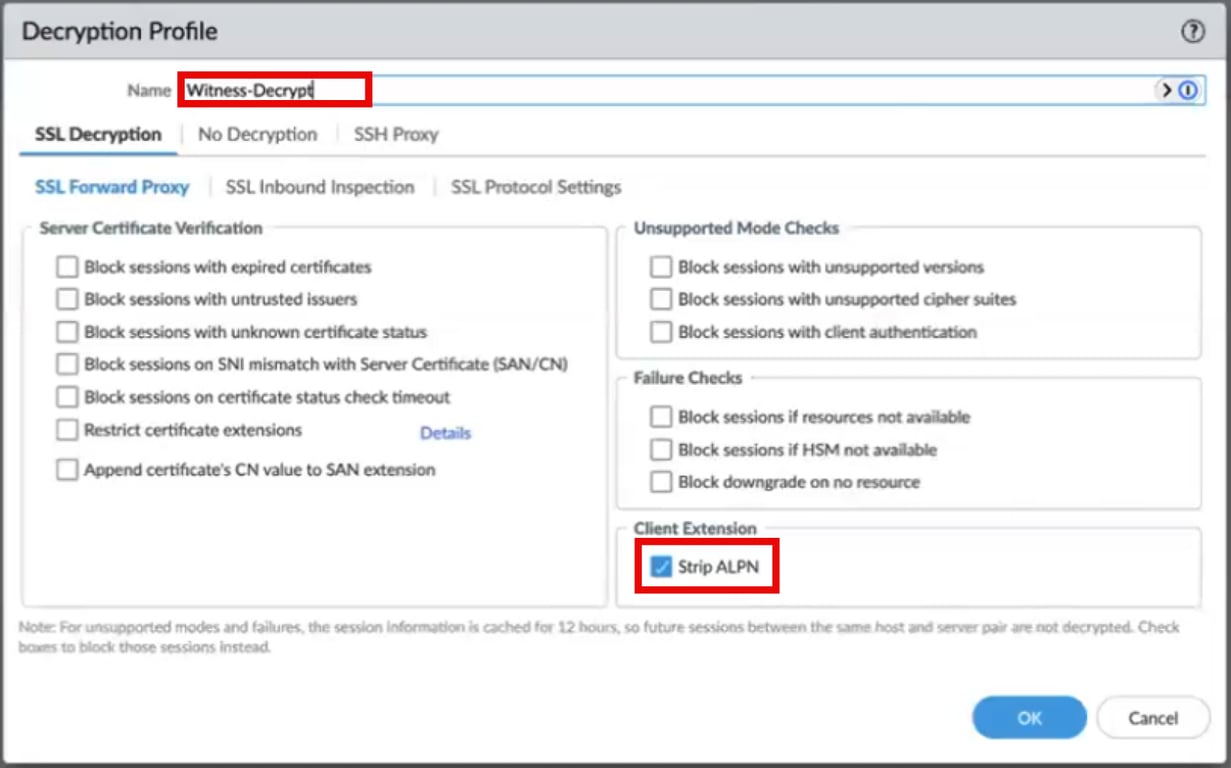
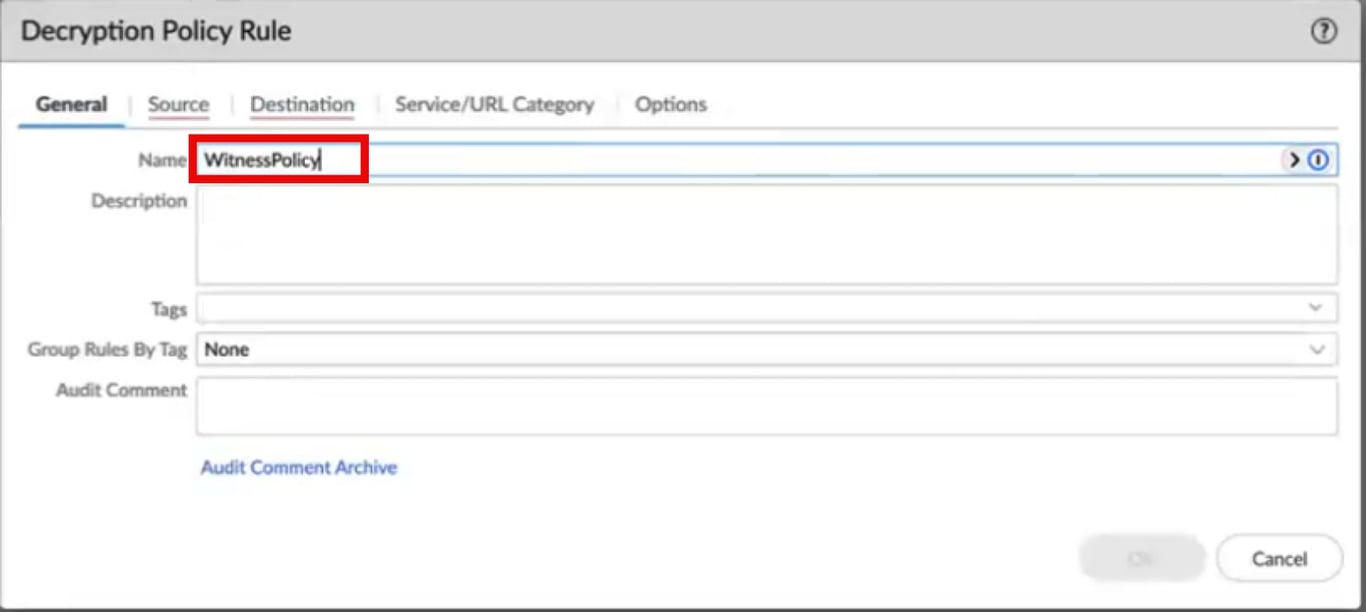
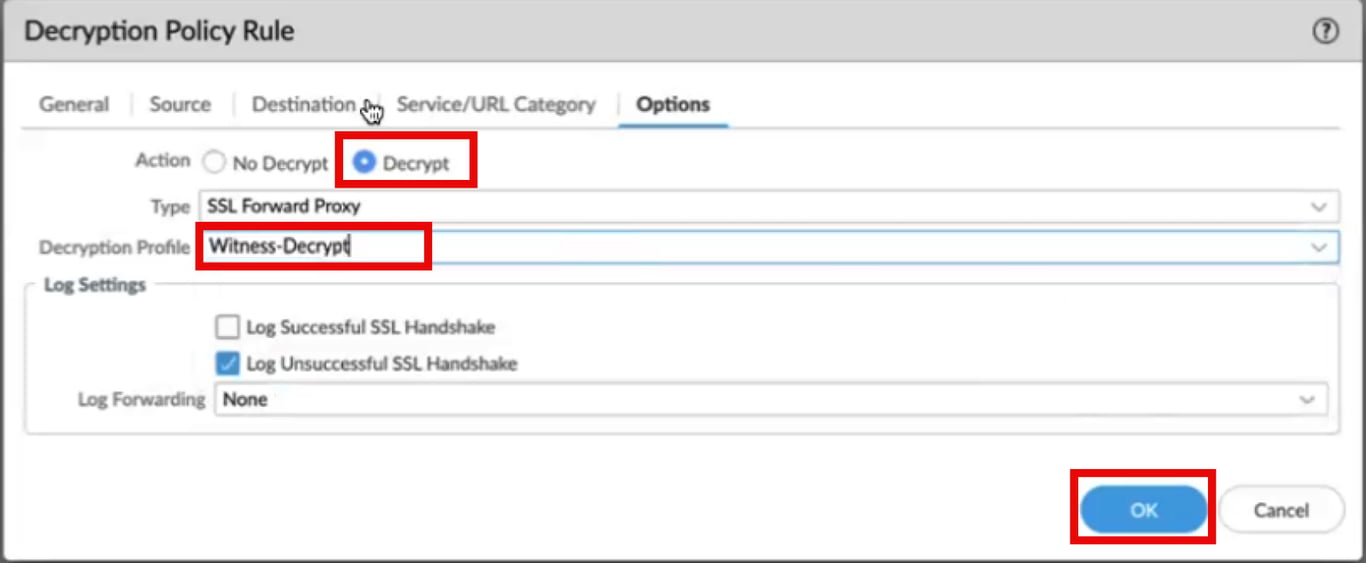
Create Decryption Profile & Policy
- Go to Object → Decryption → Decryption Profile → Add
- Set the following configurations:
- Name → Witness-Decrypt
- Enable Strip ALPN
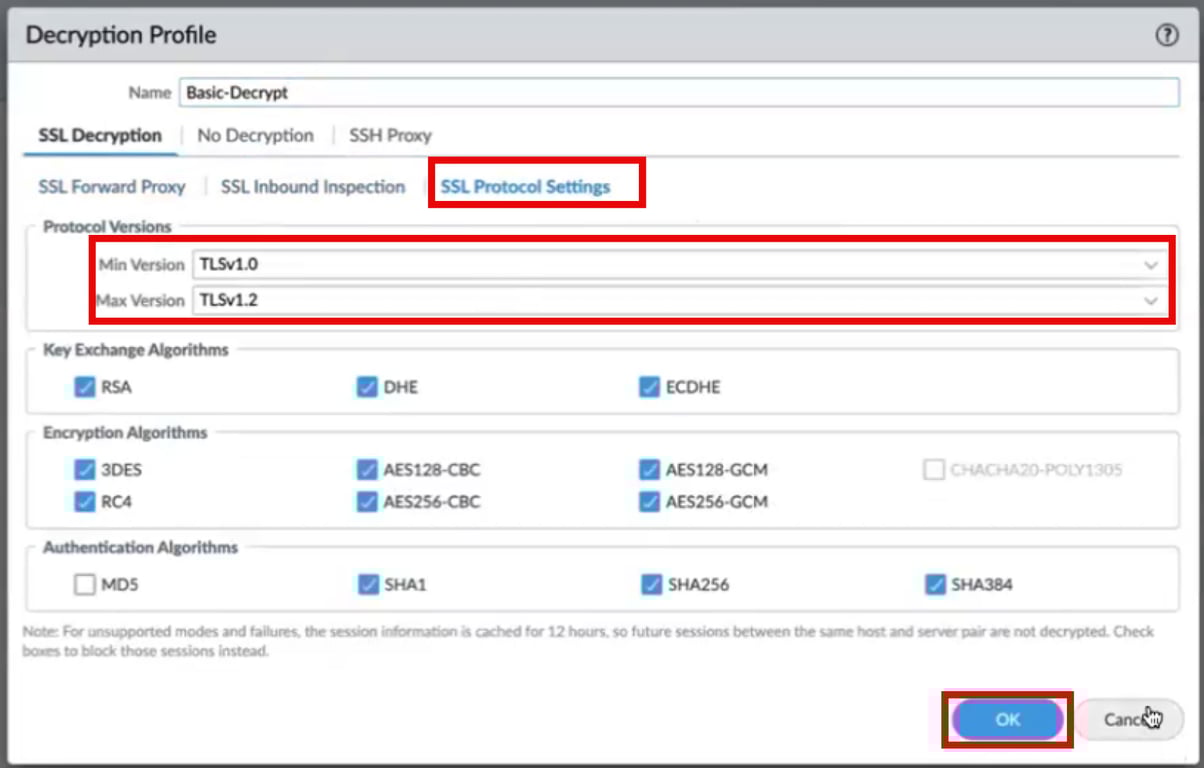
3. Click SSL Protocol Settings and configure the following:
- Min Version → TLSv1.0
- Max Version → TLSv1.2
4. Go to Policies → Decryption
5. Create a new decryption policy for decrypting all SSL traffic going towards the AI URLs maintained by Witness AI.
- Source Zone → LAN/GP Zone
- Destination Zone → WAN
- URL Category → WitnessURLs
- Action → Decrypt
- Type → SSL Forward Proxy
- Decryption Profile → Witness-Decrypt
Note: Create a new Profile and make sure that the Strip ALPN checkbox on the Decryption Profile is enabled
Create Security Policy for DNS Sinkhole
Use the URL Filtering Profile and Anti-Spyware Profile in a security Policy created for allowing access to AI URLs maintained by Witness AI.
- Go to Policies → Security
- Create a new security policy for allowing traffic towards AI URLs maintained by WitnessAI.
- Source Zone → LAN/GP Zone
- Destination Zone → WAN
- Action → Allow
- Anti-Spyware Profile → WitnessAI_Sinkhole
Create Security Policy for URL Filtering
Use the URL Filtering Profile and Anti-Spyware Profile in a security Policy created for allowing access to AI URLs maintained by Witness AI.
- Go to Policies → Security
- Create a new security policy for allowing traffic towards AI URLs maintained by WitnessAI.
- Source Zone → LAN/GP Zone
- Destination Zone → WAN
- URL Category → WitnessURLs
- URL Filtering → WitnessAI_URL-Filtering
Implement Block for Quic Protocol
Quic is a Google developed protocol which uses UDP for web connections and limits the firewall visibility and ability to analyze and apply security actions.
- Note: If the Quic protocol is not already blocked, please perform this step.
- Go to Policies → Security
- Click Add to create a new security policy for blocking quic protocol.
- Name the rule Quic Block.

4. Block any quic protocol traffic from LAN/GP Zone towards the internet.
- Source Zone → LAN/GP Zone
- Destination Zone → WAN
- Application → quic
- Action → Deny
5. Click OK
6. Move the Quic Block rule to the top.
Commit Change
The last step is to commit the change to the firewall. This will implement and enable the configuration changes made.
- Click Commit
- Review changes and implement the configuration changes.
Palo Alto Networks NGFW ConfigurationPrerequisitesBackup Your ConfigurationVerify licensesInstall WitnessAI Root CertificateSetup EDL Certificate ProfileCreate External Dynamic ListCreate Custom Application for OfficeRedirect AI Traffic to WitnessAIURL Filtering Profile to add User InfoCreate Decryption Profile & PolicyCreate Security Policy for DNS SinkholeCreate Security Policy for URL FilteringImplement Block for Quic ProtocolCommit Change